Archive for March, 2009

Sunday Night Dinner: Mole Enchiladas

March 29, 2009

Mole Enchiladas is the first dish I ever made Adam that I was truly afraid he’d hate. It’s an odd dish, and one that looks, well, disgusting. But… YUM! And luckily – he agreed with me! Unfortunately none of our friends that we’ve forced it on have been big fans, but that’s alright. We still enjoy it.

Mole is a Mexican sauce made from cocoa. It’s quite bitter, and usually has quite the kick to it. You find it in Mexican restaurants sometimes – but almost always paired with chicken, which doesn’t help me so much… so, I’m glad we can cook it at home and keep it veggie.

Our concoction is not something that has much of a recipe, really. It changes every time we make it – but it’s a very simple throw together meal, so long as we have a few key ingredients:

  • Black beans
  • Tortillas
  • Something spicy… jalapeño or green chilis
  • Cheese 
  • Mole sauce, of course

Other than that, it’s really whatever you have on hand. In this particular batch, we used some leftover mixture of black bean, red bean, and onion which had been pulsed a few times in a food processor. Then we threw in some avocados, because we had some to use, and some mushrooms.

And yeah – I’m sure you could make homemade mole sauce. And I’m sure that would be way better and all, but the stuff in the jar is so darn easy.  We always buy the Doña Maria brand, which comes in paste form in a little glass jar. You mix it with veggie broth (I think it’s 3 parts broth 1 part paste), and after letting it cook for a few it turns into a thick black goo. Or should I say, a delicious thick black goo!

Pour the goo over the pre-assembled enchiladas, bake in a 350°F oven for… a bit. Maybe 20 minutes? Until everything is bubbly and the cheese is all melty. Then, enjoy!
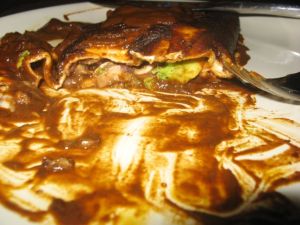
Eeeeew! But... YUM!

Eeeeew! But... YUM!

If it helps, don’t look at the plate. It looks so gross. Really.

Toasted Almond (in liquid form)

March 29, 2009

Neither of us are big drinkers, but we like the occasional after work drink, and our default has always been opening up a bottle of wine. But as our liquor collection grows, we’ve been experimenting a bit with cocktails.

Tonight we made one worth remembering, thanks to Adam’s new iPhone app: Toasted Almond

Pretty simple:

  • 1 shot kahlua
  • 1.5 shot amaretto
  • 2 shots half-and-half 
  • 1 maraschino cherry (which we didn’t have.. oh well) 

Stir and serve on the rocks.

YUM


Toasted Almond

Toasted Almond

Inside Number 71: The Mantle

March 29, 2009

We’ve been in this house just over two years, and are starting to feel like we’re outgrowing a few of the decorative choices we made when living in our shoebox apartment. We’ve been making little changes here and there that we’re pretty happy about, but are always on the lookout for more ways to make our home feel more “us”.

Our biggest concern of late is that the main level of our house is a bit too… dull. It needs more colour. More life! We have fairly beige walls, with a sage green couch and chair, and a number of brown accents – including a lot of wood.

The biggest piece of art we have is a large square canvas that lives above the mantle. And while I still like it a lot – I’m not thrilled with the colour pallet of browns and beiges. We’ve been on the lookout for something new for awhile, but nothing has really hit us yet. It doesn’t help that we’re not too keen on spending a lot of money – and it’s a fairly large piece.

Anyway, all of that said – we made one (very minor) change today that I think I’m happy with:

Before

Before


After

After

Yeah – the change is very subtle. A new vase and a small bird-shaped candle holder. A good change? I hope so.

Besides changing the large piece above the mantle, we also want to swap out the artwork in the dining room:


Dining room art

Dining room art

Nothing wrong with them, it’s just time for a change!

The perfect way to wake up.

March 29, 2009

What a great way to wake up on a lazy Sunday morning…


Kitties in my bed!

Kitties in my bed!

More cooking from scratch: Hamburger Buns

March 22, 2009

img_3069In part two of our “things you wouldn’t usually think to make from scratch” weekend, we made up some hamburger and hotdog buns! With the bread maker, it’s quite easy. It had a few unusual ingredients (dry milk, potato flakes), they turned out just about perfect.

The first step was pretty simple – take the dough out of the bread maker and cut it into 12 equal portions (this is from 2lbs of dough). Then shape it into a bun shape – either round and flat for hamburgers, or long for a hotdog. Then cover with plastic wrap and let rest for about a half hour, glaze with a bit of egg yolk with water and sprinkle sesame seeds on top. They only baked for about 20 minutes, and came out golden and lovely.

I made some veggie burgers for myself – easy enough that I’d definitely do it again, but maybe not exactly the same. A pretty simply recipe from Mark Bittman – 2 cups beans (choice on type – I used red and black), one onion, 1/2 cup oats, salt/pepper, 1 egg, and 1 tbsp chili powder. All ingredients go into a food processor and are pulsed until chunky but not puréed, then shaped into patties and cooked for 5 minutes per side. Overall a very good texture, but a bit too much hot spice without enough other spices. Next time I’d reduce the chili powder and add some garlic or other flavour.

We had a friend over for BBQ Sunday for lunch, and I think he enjoyed his burger and homemade bun.


YUM!

YUM!

Homemade noodles for Fettucini Primavera

March 22, 2009
Dinner42

Perfect Saturday Evening

We’ve made homemade pasta a few times, and I dare say we’ve finally gotten the knack for it. Homemade pasta is one of those things that even two years ago I would’ve thought was a crazy endeavor. Sure, my mom had a pasta maker – and we would once a year laugh our way through the ridiculous instructions for making the dough. You’re supposed to beat an egg inside of a pile of flour. Which, while it always seemed to work well for Mario Batali, just didn’t work for us. We’d end up laughing hysterically with a counter covered in egg that had escaped over the edges of the flour tour… And even a dozen eggs later when we’d eventually get the dough to get a decent consistency – the process took a while. One person manned the hand crank while the other cautiously fed the dough through the pasta maker, and a few hours later you’d have homemade noodles. 

Granted, the process led to some pretty amazing pasta, but it was a process. It took hours. Then I discovered two things that made homemade pasta a much more realistic endeavor:

Step 1

Step 1

1. There is a much much easier way to make the dough itself – with the food processor! Put flour and salt into a food processor fitted with a plastic blade, and slowly pour the egg in while it runs. Eventually you’re supposed to end up with a nice ball of dough. It’s not quite that easy for me – I usually end up with many many small balls of dough, but it’s pretty easy to take out and mash together into a nice solid ball.

2. This is a miracle – a pasta roller attachment to our KitichenAid stand mixer. It’s so easy! You turn it on and it suddenly becomes a one person job, and you can get a whole pound of pasta rolled out in 30 minutes or so.

On Saturday evening, Adam and I decided to make pasta from scratch for a nice relaxing evening in. A really lovely and simple fettucini primavera, which definitely benefits from using the freshest ingredients and homemade pasta. It turns a fairly boring meal into something really special.

Here’s a few photos of our adventures in making pasta!

Not looking so good... yet

Not looking so good... yet


While it always turns out well in the end, this is how it always starts out… weird and in many little clumps. Luckily once I pull it out of the food processor and knead it a bit by hand I always end up with a nice solid ball. 


First time through

First time through


The next step is to feed the dough through the pasta maker. You start with it quite thick, and each time go a step thinner. 


img_3048

That's a lotta pasta!


Yup – that little piece of dough ended up this big in the end! In fact, I think this was step 7 of 8.


Cutting into Fettucini

Cutting into Fettucini

Pasta drying on our super fancy drying rack.

Pasta drying on our super fancy drying rack.


And finally, we cut it into fettucini by changing the rolling head to one that cuts it as it goes through. We also ahve a spaghetti cutter.


Then we cooked up a few veggies (which we got in Friday’s delivery) with a bit of cream and tossed it with the cooked pasta. Homemade pasta cooks very quickly – it’s in the boiling water for only 30 seconds to a minute and it’s just right.

And finally, we have a lovely meal! Which clearly, Adam enjoyed…


He likes it!

He likes it!

Friday Night Challah

March 21, 2009
YUM! YUM!

We volunteered to bring a loaf of challah to Adam’s family’s Friday night dinner last night, and I’m pretty happy with how it turned out – but more with appearances than taste, this time. We’ve made it before, but always just using the recipe that came with our bread machine – a pretty basic recipe that used a lot of butter. We subbed in margarine to keep it parve for the usually-meat-heavy-family dinners, but it kept that really buttery light texture that was very, very good.  As my sister-in-law Laura commented last night, it made it have more of a croissant texture, which was just lovely.

We used a recipe from a new cookbook this time, which instead of using sugar and margarine, it used vegetable oil and honey, and two eggs plus an egg yolk (the other just used two whole eggs). There was one other big difference in this challah – but only because of how I made it. I didn’t have a big enough chunk of time on Friday to devote to making it from start to finish, so I actually made the dough Thursday night, and put it in a tightly covered bowl in the refrigerator. I was a bit worried about that,  but what I’d read online actually suggested that bread can benefit from that. The idea is that because it rises much slower, the flavours have more time to intensify. That worked for me – my only other option was picking up store bought challah, so may as well give it a shot. 

Friday morning I was a bit worried. It had risen a lot overnight. Easily it had already doubled, and I wasn’t going to be braiding it until about 4pm. I released some of the pressure from the plastic wrap and re-wrapped it, and left for the day. Luckily when I got home it hadn’t risen much more in all that time, so I got to work.

I probably should’ve given it time to get back to room temperature, but I was in a bit of a rush, so to punch down and do the last knead, I put it back into the bread maker. It got a lot of the air out of it and it shrunk back to a manageable size – so I got on with braiding the still pretty cold dough. 

After braiding, but before the last rise

After braiding, but before the last rise

I wanted to do a slightly fancier braid this time – so I’d enlisted the help of YouTube to learn how to do a six-strand braid. Lynne had also requested I bring a smaller challah bun, so I found a way to do a “braid” only using one strand. I think it worked out pretty well!

I let it rise a little longer than usual because at that point the dough was still pretty cold. To speed it up I turned the oven on so that it was at least sitting on something warm. After about an hour and a half, it had puffed up pretty nicely and was ready to bake. I glazed it with a bit of egg and sprinkled on sesame seeds and popped it into a 350°F oven for about 40 minutes (the little one came out after about 20), and it came out all golden and beautiful.

Overall – a good loaf. Definitely pretty, and generally pretty tasty. I’m not sure I’ll make this recipe again, though I may want to try it without the refrigeration step. It just wasn’t as light and well, buttery, as the version that used margarine instead of vegetable oil.

Green Earth Organics

March 21, 2009

GreenEarthOrganics

Yesterday I came home from work to a bin full of everything you see on the left – all organic fruit and veg from Green Earth Organics. We’ve been getting it for about 5 months now every other Friday and I’m still excited when I come home to our bin full of goodies. We leave the empty bin on our table in the back, and when we get home it’s magically been replaced with a full one! Yay!

In the summer I’d say it’s 90% local (from either Ontario or Quebec, typically), but in the winter we get things like mangos and avocado, which clearly has to travel.

I like that you can sub in things you don’t like if you check the list the week before, and you can add other grocery items onto your delivery if you want (though we’ve never done that). I also really like that we end up with stuff we’d never think to buy on our own, so while we could choose to sub those things out, we instead get an excuse to find new recipes and learn to cook with new foods… like how much of a pain in the ass it is to start with a whole pie pumpkin. Next time I’ll just buy the can, thankyouverymuch. But we’ve also discovered we like the simplicity of cooking other types of squash, and having veggies on hand for throwing into whatever we might be cooking.

We do definitely supplement our veggies a bit from the grocery store, but a big part of that is that we eat vegetarian at home – so the two of us do use lots of vegetables in everyday cooking.

If you’re in the Toronto (or Vancouver) area, I’d definitely recommend you check it out. We get the smallest bin for $37. If you do join – please list us as referrers! The account is under Adam’s name.

A weekend of baking…

March 16, 2009

No pretty pictures this time, but Sunday was filled with lots of lovely baking and cooking. A quick summary of what we made:

  • Blarney Stone Bread –  Very very tasty and rich bread. We made a 2-lb loaf, which ended up rising too much in  our bread maker, making the top unusable – but once we cut that off it was quite yummy inside. We used this loaf for Sunday’s lunch sandwiches (egg salad and cucumber with cheese) at the Neuman’s.
     
  • Oatmeal Chocolate Chip Cookies – A simple variation on the classic Betty Crocker Oatmeal Raisin recipe. I’ve never been a  big fan of raisins in cookies, so the chocolate chips were a welcome substitution.  One batch made plenty to take with the sandwiches, plus leave a number for us to eat for the week.
     
  • Vanilla Yogurt – We’ve had a yogurt maker since December, and I LOVE IT. I try to make yogurt at least once a week – one batch usually gets both of us breakfast every morning with some granola. Speaking of granola…
     
  • Cinnamon Maple Granola – With our fresh yogurt, we usually have granola. We typically have bought the PC Organics Honey Almond Granola, which is YUMMY, but at $6 per (small) box, it gets pricey. So we took a shot at making our own. It turned out quite nicely. Next time I think we’ll try honey instead of maple, but it’s a nice treat.
     
  • Oatmeal Millet Muffins – These are good, but I don’t know that they’re top of our list for next time. We bought some millet a few months ago for some pumpkin millet muffins that were really wonderful, but we made these as we didn’t have an pumpkin on hand. The muffins taste great, albeit quite sweet, but the texture is a bit off-putting. Very very moist and sticky. If I make these again, it would be with a lot less sugar.
     
  • Light Whole Wheat Bread – Since we ate all of the Blarney Stone Bread on Sunday, we needed another loaf for lunches. This bread scared me. It only had 3 cups of flour total (2.5cups white, 1/2cup whole wheat) for a 1.5lb loaf, and in the bread maker it looked very wet and was a lot smaller than most dough balls for that size loaf. I actually was a bit worried I’d counted out the flour wrong and didn’t put enough in. Sure enough it rose. And rose and rose. The little wet ball of dough rose so much it tried to escape the bread maker, meaning once again, the top of the loaf had to be cut off. Bah! And while it tasted good, it was so airy it barely held together when being cut into sandwich slices. So, we’ll scratch that one off of the list for future weekly loaves…

The Big Ragu

March 15, 2009
The Big Ragu

The Big Ragu

Back in the winter of 2007, when Cari and I were first getting settled into our new house, we paid a visit to The Big Ragu, a small (no more than ten tables) trattoria on Lansdowne Avenue, just south of St. Clair West. We had a positive experience, but for whatever reason kept putting off a second visit.


When dinner plans finally materialized with our friends Shane & Mitzi, we decided to take them to The Big Ragu. We had the authentic Italian dinner experience: Sat down at 7:30, shared a litre of wine (montepulciano) and feasted on a delicious array of Italian delights. Cari and I shared the “magic mushrooms,” which combined two of our favourite things: mushrooms and goat cheese. For our entrees, Cari had gnocchi and I had quattro stagioni pizza. Before we knew it, we had sipped the last of our cappuccinos and eaten the last of our strawberry cake, and it was 10:30. Sometimes the best dinners are the ones where time stands still and flies by at the same time.